Another Custom Post Type: Meal Menus
Go to the CPT UI part of the Dashboard and choose Add / Edit Post Types.
For the slug, use meal_menu.
Fill in the Plural and Singular labels (with Meal Menus and Meal Menu, respectively) and then click the Populate additional labels based on chosen labels link.
In those populated fields, remove the word my from the Menu Name (so it becomes just Meal Menus).
In Post Type Description, add Dishes and prices. Use a separate two-column table for each section: entrees, sides, drinks.
Then move down to the Settings section. Set the following:
- Show in Nav Menus: False
- Has Archive: False
- Menu Position: 6
- Menu Icon: dashicons-heart
- Supports: choose Title, Editor, Custom Fields
Then click Add Post Type. You should now see the new Meal Menu post type in the Dashboard sidebar.
Some Custom Fields For the New Post Type
In the Custom Fields Dashboard area, add a new field group and call it Meal Menu Properties.
Then click Add Field. Give it these values:
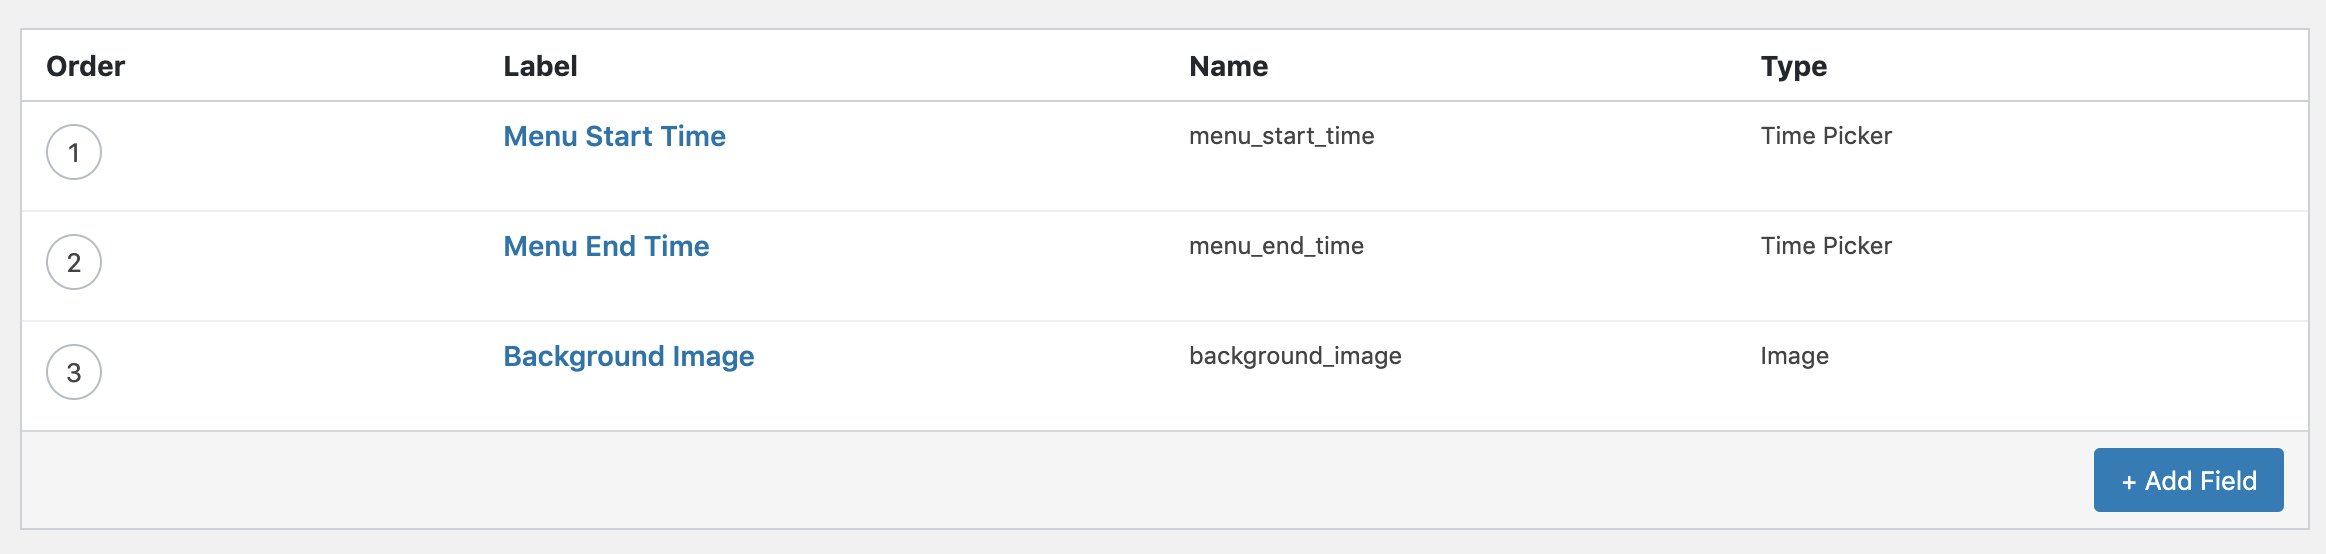
- Field Label: Menu Start Time
- Field Name: menu_start_time
- Field Type: Time Picker
- Instructions: Choose start time for menu.
Click Close Field (at the bottom of this field) to make the interface less cluttered.
Then click Add Field. Give it these values:
- Field Label: Menu End Time
- Field Name: menu_end_time
- Field Type: Time Picker
- Instructions: Choose end time for menu.
Click Close Field again to make the interface less cluttered.
Finally click Add Field one more time. This time, use the following values:
- Field Label: Background Image
- Field Name: background_image
- Field Type: Image
- Instructions: Choose an image at least 2000px wide to be a background to the menu.
- Minimum Width: 1500px
- Maximum Width: 3000px
Click Close Field so we can get a bit of space back.
At this point, check that you have three new Custom Fields, with all the properties shown in the screenshot below.
Now, we’ll add these custom fields to our custom post type.
In the Location section, set the Rules to Post type is equal to Meal Menu.
In the Settings section, set the following properties:
- Active to Yes,
- Position to Side
- Description to Meal Menu: add start time, end time, and background image.
Click Publish in the top right of the page.
Make a New Meal Menu
Click Add New from the Meal Menus area in the Dashboard Sidebar.
Here we see the title and editor areas, but our additional custom fields are there on the right.
(Note: the screenshot says “Food Menus” because it was made during an earlier version of this exercise. May apologies for the inconsistency.)

Put the word Breakfast in the Title area.
More Data
To save time, I’ve put some content for you to use in the Editing area. It is in the Page called Data For Exercise. Open that page.
I’ve given you three table blocks for each menu time. Copy the first three tables (from the Breakfast section in this page) into your new Food Menu titled Breakfast.
An aside: these tables were created with the PublishPress Blocks plugin, as it supported table headers, which Gutenberg’s native table block did not at the time this exercise was made.
The easiest way to do this copy might be to go to Code Editor: click on the vertical ellipsis ( ⋮ ) in the top right to find it.
Here are the blocks we want to get first:
<!-- wp:advgb/table {"changed":true} -->
<table class="wp-block-advgb-table advgb-table-frontend"><thead><tr><td>Entrees</td><td>Price</td></tr></thead><tbody><tr><td>Eggs Benedict</td><td> $18</td></tr><tr><td>Croque Monsieur</td><td> $18</td></tr><tr><td>Croque Madam</td><td>$22</td></tr><tr><td>Salmon Plate</td><td> $18</td></tr><tr><td>Fruit Plate</td><td>$21</td></tr><tr><td>Poached Eggs</td><td> $18</td></tr><tr><td>Avocado Toast</td><td>$21</td></tr><tr><td>Vegetarian Omlette</td><td>$22</td></tr><tr><td>Cottage Cheese</td><td> $18</td></tr><tr><td>Oats</td><td>$19</td></tr><tr><td>Deluxe Avocado Toast</td><td> $18</td></tr><tr><td>Premium Avocado Toast</td><td>$22</td></tr><tr><td>Pancakes</td><td>$21</td></tr><tr><td>French Toast</td><td>$19</td></tr><tr><td>Texas Toast</td><td> $18</td></tr><tr><td>Poutine</td><td>$22</td></tr></tbody></table>
<!-- /wp:advgb/table -->

<!-- wp:advgb/table {"changed":true} -->
<table class="wp-block-advgb-table advgb-table-frontend"><thead><tr><td>Sides</td><td>Price</td></tr></thead><tbody><tr><td>Hash Browns</td><td>$6</td></tr><tr><td>Waldorf Salad</td><td>$6</td></tr><tr><td>Fish Soup</td><td>$7</td></tr><tr><td>Cantelope</td><td>$5</td></tr><tr><td>Bacon</td><td>$6</td></tr></tbody></table>
<!-- /wp:advgb/table -->

<!-- wp:advgb/table {"changed":true} -->
<table class="wp-block-advgb-table advgb-table-frontend"><thead><tr><td>Drinks</td><td>Price</td></tr></thead><tbody><tr><td>Milk</td><td>$4</td></tr><tr><td>Chocolate Milk</td><td>$4</td></tr><tr><td>Orange Juice</td><td>$4</td></tr><tr><td>Café au Lait</td><td>$4</td></tr></tbody></table>
<!-- /wp:advgb/table -->
Copy and paste that code (from the Page I’ve given you) into the Breakfast Meal Menu editor area.
When we do this, we see three tables and all their block properties in the left side of the screen.
In the sidebar on the right, click in the MEAL MENU tab. This will get us back to our Custom Fields properties: if you’re in a particular block, the Properties area on the left side will show block properties instead. There will be slight differences between what you see and the screenshot below. Just make sure you’re viewing properties for the post, not for a block.

This will allow you to see the Meal Menu Properties custom field group. It’s probably at the bottom of this sidebar.
In those fields, choose a Start time of 4 am and an End time of 11:30 am.
Finally, click on the Add Image button in the Background Image section.
Choose the food image with the strawberries and avocado on a white plate.
Click Publish.
If we now click Preview, we will again see … not much.
We’ll fix that in part five of this exercise.