Theory: Custom Post Types
WordPress has two main kinds of content: posts and pages.
Posts are organized with tags and categories. They typically have titles, content, excerpts, feature images, etc.
However, much content doesn’t really “fit” that method of organizing.
Fortunately, it is possible to create other kinds of post types through a feature called Custom Post Types.
With the addition of Custom Fields, which we’ll learn about shortly, we can make our content types much more responsive to our users’ needs.
For our restaurant client, for example, we are going to want to build:
- three meal menu areas (for breakfast, lunch, and dinner), each with sections for entrées, sides, and drinks.
- a section to showcase restaurant employees
We could use posts organized by categories for each, but that’s already more confusing that it needs to be, and unless the site owner already knows WordPress, it’s not particularly intuitive.
As noted, any post has a title, a feature image, an excerpt, and a main editing area.
With just the editing area, someone making a new employee piece of content wouldn’t know where to put what. And they might format the HTML differently than how the theme designer expects, etc.
Theory: Custom Fields
As noted above, WordPress by default doesn’t have a lot of ways of organizing our post data: tags, categories, excerpts, titles, feature images.
We might (or might not) have used WordPress native custom fields in an exercise or two already. They let us add other content specific to the type of content we are writing. But they’re not especially intuitive or powerful to use or to theme with, either.
Which is why the Advanced Custom Fields plugin is on over one million active installations.
In this exercise, we will make two Custom Post Types, and use Custom Fields in each.
A user who needs to change a staff member’s job position, or change the operating time of a particular menu, will have an easier time, because there will be specified fields reserved for that information.
As well, the Dashboard will have a separate area for each. To the site owner, this is far more intuitive a way to organize their content than generic posts and categories.
The Practice: CPT UI
Lets make our first Custom Post Type. We’ll start with an easy one.
You should see in the Dashboard, on the right side, a section for the CPT UI plugin. If you don’t see it, make sure that the plugin is active.
Click on it and choose Add/Edit Post Type.
Basic Settings Section
In the Basic Settings section, enter these values.
- For post type slug, type staff_member
- For plural label, type Staff Members
- For singular label, type Staff Member
The slug is like the machine names we saw when we made menu locations. Slugs will always need to be URL-friendly.
Labels should be human-friendly. The plural field and singular field dictate how WordPress will display the elements in the Dashboard.
In the Dashboard, the post type will sometimes be referred to as singular, but as plural in others.
To understand that, think about regular posts: in the Dashboard sidebar, there is an area for Posts (plural), but when we want to make new content, we click New Post (singular).
Additional Labels Section
There are actually a lot more label areas in the WordPress UI, but fortunately this plugin can fill them in for us.
To do that, click the Populate additional labels based on chosen labels link.
This will fill out most of the remaining labels, which saves time because we’ll only have to change a few.
Specifically, change the following labels:
- Menu Name: remove My
- Archives: change to Our Staff
Most of the Additional Labels are pretty self-explanatory, and the automatic filling out of them typically does a more competent job than a person trying to do it on their own.
Settings Section
In the Settings section, make the following changes:
- Show in Nav Menus: set to false.
- Has Archive: set to true
- Custom Rewrite Slug: set to staff
- With Front: set to false
- Menu Position: set to 7
- Menu Icon: set to dashicons-businesswoman
- Supports: set to Revisions, Title
- Taxonomies: chose Tags
To explain these settings briefly:
- Show in Nav menus: we won’t want the staff member custom post type added to navigational menus that the user makes in the dashboard. It would be weird for this type of content.
- Has Archive: We might want to be able to collect all the staff members together and display an archive of the staff members, like clicking a category or tag link would do.
- The Custom Rewrite Slug lets us determine how the URL of our Custom Post Type archive is written.
- With Front determines whether the permalink rules set in Settings in the Dashboard will apply.
- With the above two settings, our staff member archive URL will be https://oursite.com/staff
- Menu Position in the Dashboard is set by a number. Posts are 5, so we’re putting Staff at 7 (because we’ll later put the Meal Menus at 6).
- The Menu Icon is part of an icon font called Dashicons which comes with WordPress (get it? Dashboard Icons), In CPT UI, you can click a button to see the icons
- Supports: None means that we don’t want much of the traditional post type UI to apply to this Custom Post Type. Instead, we will make different, more specific, fields. All we’ll keep of the traditional Post features is title and revisions.
- Taxonomies. But we’ll maybe also use Tags as a way of suggesting links between staff profiles.
And now, click Add Post Type
You should see now in the Sidebar of the Dashboard an area for our New Post Type. Here’s mine:
Oops: it looks like I accidentally on purpose forgot to remove My from the Menu Name. Yours will be fine if you followed the instructions above.
To fix this issue, I just need to click on the Edit Post Types tab in CPT UI. Then I can go into the Additional Labels section and remove that word from Menu Name. Here it is fixed.

Now, go to the Staff Members menu item and click Add new. Look at the interface:

The only thing we see is the PUBLISH box and the TAGS box.
If we wanted more of the traditional Post UI elements, we can specify them when we make or edit this Custom Post Type.
Let’s do that: edit the Staff Member Custom Post Type and add back Feature Images by clicking the appropriate button in the Supports section.
As an aside, you could even change the name the feature image will appear as to the user. That can be done in the Labels section (there are four fields to edit, if you want to do that):
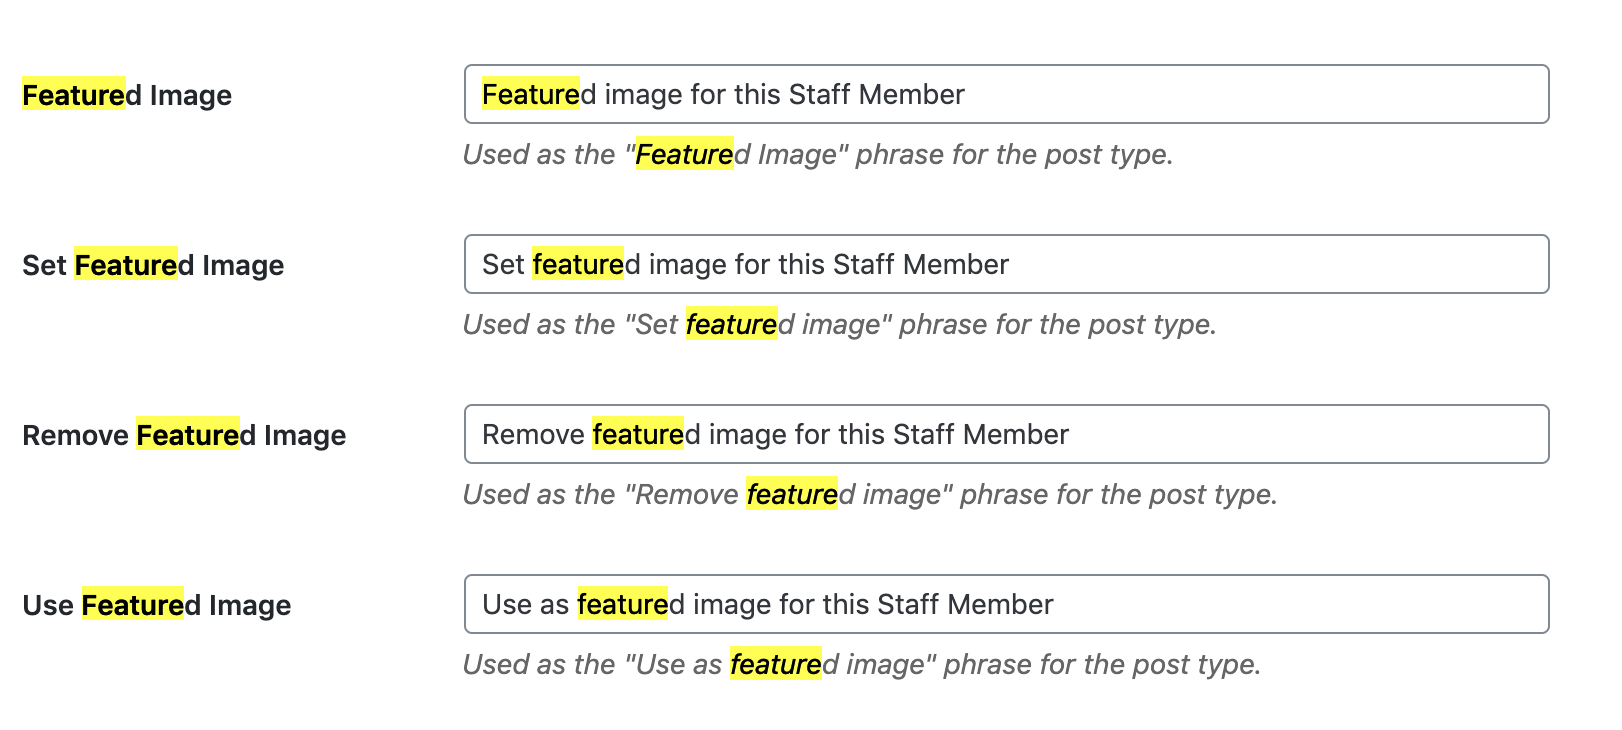
For example, you could change the first of the fields pictured here to Staff Photo for this Staff Member, etc.
The Practice: Advanced Custom Fields
Now go to the Custom Fields menu in the Dashboard sidebar.
Add a new Field Group called Staff Member Properties. A field group is, as you would expect: a group of fields. Each field we will make will be for the site owner, or an employee, to input data about particular posts, or custom posts.
Custom Field 1: Staff Member Position
Click the button to Add Field. Label the field Staff Member Position. Use the following values:
- Field Label: Staff Member Position
- Notice now the Field Name. It will automatically transform the field label into machine-friendly syntax (which is pretty slick UX, if you ask me)
- Keep the Field Type as Text.
- For Instructions, put Enter the Employee’s official position.
- Set Required to Yes.
Once you’ve done this, click the Update (or Publish) button.
Custom Field 2: Staff Member Description
Next, add to our Field Group another Field called Staff Member Description.
Use similar values as above, but change the Name and Instructions class to end with the word description. As well, set the following:
- Field Type: Text Area
- New Lines: Automatically add Paragraphs.
Once you’ve added Fields, you can click on Field Label (blue link) to collapse them.
Finally, save the Field Group by clicking the Update button.
Location Section
After adding those two fields, go to the Location Section and then set Show this field group if to Post type is Equal to Staff Member
Settings Section
In the Settings Section, use these values:
- Active: Yes
- Style: Standard (WP metabox)
- Change Position to High (After Title)
- Description: “This field group is for name and description of employees, for use with Staff Member Custom Post Type.”
Finally, make sure that there are only two fields in the field group. If you have more, mouse over extra ones and delete them.
In the Publish box on the top right of the page, click Update.
Now, move on to part three of this exercise.